Importing your episode from Riverside to Castos
For our creators who use Riverside.fm to record and edit episodes, importing your episodes into Castos is now just a click away.
What is Riverside?
Riverside is a virtual studio that allows you to remotely record and edit your audio and video. You can give Riverside a try today for free.
| Jump To | Importing Audio Episodes |
|
|
Importing Video Episodes |
|
|
Importing Audio-only from a Video Clip |
NOTE
If you're new to Castos, you will first need to create a podcast (the show) to begin importing Riverside-created episodes. You'll assign the episode to that podcast on the Riverside import screen.
Importing Audio Episodes (available to all Castos subscribers)
When your audio-only episode is edited and ready to be exported and published, you'll need to export the file as an MP3 (Riverside defaults to WAV - some podcast directories do not support WAV files so please be sure to export as a MP3).
- In the Riverside editor, click Export (some people might see Share)
- For Audio Quality, select MP3
- Optional: Choose to Normalize Audio Levels and/or Remove Background Noise.
- Click Export.

- When the exported clip (episode) is ready to be shared, click on the clip to enter the Publish page. On this page, you'll see the Castos logo. Click the Castos logo.

- Give your episode a proper title and click Export.
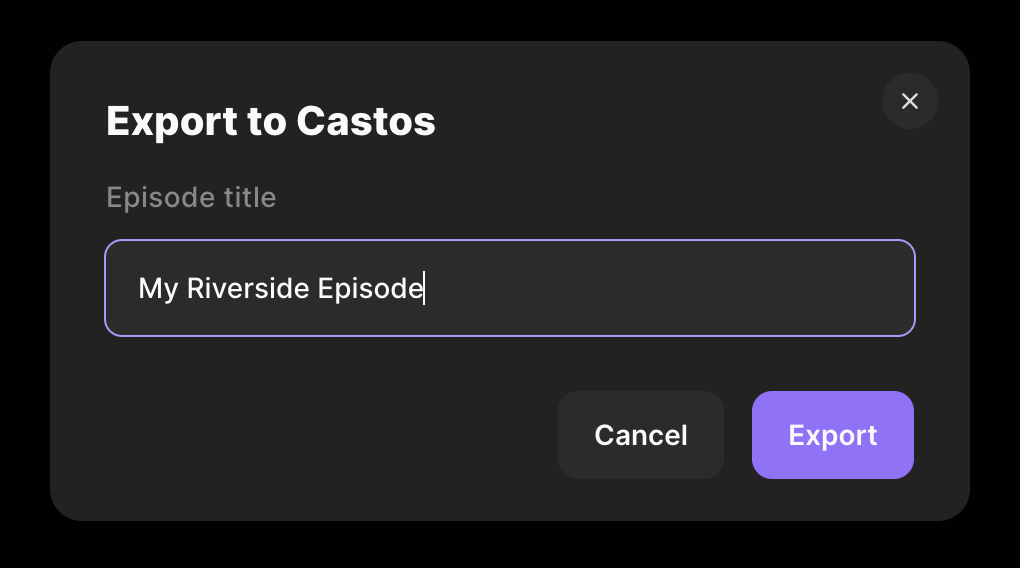
- Once you click export, a new window will open and bring you to a Castos import page (as long as you're logged in to your Castos account). On this page, you'll have another chance to edit your episode title, select the podcast you wish to import the episode to, and select whether or not you want to import the transcript from Riverside. Click Create Draft Episode.

- Once you click Create Draft Episode, you'll be taken to the normal Castos episode edit page. From this page, you can enter the episode's show notes/details and other optional details. You can choose to publish the episode right away or schedule it. If the episode is not quite ready to be published or scheduled, you can save it as a draft.
Importing Video Episodes (Only available to Castos Pro Plan Subscribers)
When your video episode is edited and ready to be exported and published, you'll need to select the quality of video you want to export.
- In the Riverside editor, click Export (some people might see Share)
- Select the Video Quality (availability depends on Riverside subscription)
- Optional: Choose to Normalize Audio Levels and/or Remove Background Noise.
- Click Export

- When the exported clip (episode) is ready to be shared, click on the clip to enter the Publish page. On this page, you'll see the Castos logo. Click the Castos logo.
- Give your episode a proper title and click Export.
- Once you click export, a new window will open and bring you to a Castos import page (as long as you're logged in to your Castos account). On this page, you'll have another chance to edit your episode title, select the podcast you wish to import the episode to, and select whether or not you want to import the transcript from Riverside. Click Create Draft Episode.
- Once you click Create Draft Episode, you'll be taken to the normal Castos episode edit page. From this page, you can enter the episode's show notes/details and other optional details. You can choose to publish the episode right away or schedule it. If the episode is not quite ready to be published or scheduled, you can save it as a draft.
When working with video and choosing video quality, keep in mind that our file upload limit is 4GB. The higher the video quality, the larger the file size.
Importing Audio-only from a Video Clip
Already recorded your episode in video, but you need to grab just the audio to import into Castos? There are two ways to accomplish this.
If you've already edited the video and created an export file - click that export file to enter the Publish clip page.
-
Click the three horizontal dots and then click Edit. This will create a new copy of this clip and save the edits you've already made.


-
On this copy, you'll need to hide the video to export as audio-only.
To do this, click Tracks —> Select the Speaker name —> click the Arrow —> toggle Hide video to On. Do this for all speakers.

- Once all speakers have had their video hidden, you can click Export (or Share) and then export as MP3 file. It's this file you will import into Castos.

If you've recorded the video already but haven't yet made any edits, you can click on the video recording from your studio and then click Create New Edit.
- Make your edits to the audio.
- Follow the steps outlined in the previous workflow to hide the video of your speakers and export the recording as MP3 audio.
Need More Help with Riverside?
If you need help with how to use Riverside or have questions regarding recording/editing/exporting, please consult their help center or contact their support team.